
Friday, May 13, 2011
How to Create a System Image in Windows 7, Creating an Image in Windows 7, Image in Windows Vista.
How to Create a System Image in Windows 7
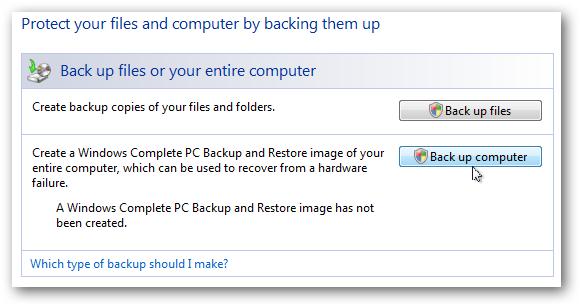
The new backup utilities in Windows 7 are actually pretty impressive and creating an image will be possible in all versions. Today we take a look at creating a backup image of your machine without the need for a third party utility like Ghost or True Image. You just just finished installing a fresh copy of Windows 7 on your computer and have it set up to your liking. One of the first things you should do now is create an image of the disc so in the event of a crash you will be able to restore it to its current state. An image is an exact copy of everything on the drive and will restore it back to its current state. It’s probably best to create an image when everything is clean and organized on your system. This will make the image file smaller and allows you to restore the system with a smooth running set up. Creating an Image in Windows 7 Click on Start go to Getting Started and then select Back up your files. Next click on the Create a system image hyperlink. Decide where you want to save the image. You can choose an external drive, burn to multiple DVD’s, or store it on a network location. You can include other drives if you want as well but remember that will add to the size of the final image. At the confirmation screen notice the amount of space the image may take. If something doesn’t look right you can still go back from this point and make adjustments. A progress meter is displayed while the images is created and backed up. In this example a disk of about 15GB in size took under 20 minutes backed up to an external drive. Times will vary depending on your system and where you’re backing it up to. After the process is complete you get the option to create a system repair disc which you should do and make sure to save it in a secure location. When it comes time to restore the image, you will be able to use the System Recovery Options to get the system back. Image in Windows Vista Vista Ultimate, Business, and Enterprise allow you to create an image, but Vista Home and Home Premium users do not have the option. The process is similar in Vista, type backup into the search bar and click on Backup and Restore Center. Then click on Back up computer and the wizard will guide you through the process. Conclusion This is a extremely handy feature and it actually works well. It is also nice that the feature will be available in each edition of Windows 7 instead of just the higher end versions. This will save you some money in not having to spend $50-80 on a third party utility. You should create an image when everything is fresh on your system so the image is not too large and the essentials of you machine can quickly be restored. For instance I created an image after a fresh install and putting Office 2007 and a few of my most commonly used programs. The entire image came in around 10 GB which is easily stored on an external drive or a few DVD’s.


Tuesday, April 26, 2011
Copy outlook Autocomplete name list to another computer. Outlook auto address Cache (history). How to transfer Outlook auto-complete addresses to a new computer?

COPY THE NAMES IN AUTOCOMPLETE TO ANOTHER COMPUTER
- On the computer with the saved AutoComplete names, go todrive:\Documents and Settings\user name\Application Data\Microsoft\Outlook.
- Click Start, and then click My Computer.
- On the Tools menu, click Folder Options.
- Click the View tab, and then, under Advanced settings, underHidden files and folders, click Show hidden files and folders.
- Double-click My Computer on your desktop.
- On the Tools menu, click Folder Options.
- Click the View tab, and then click Show hidden files and folders.
- Right-click profile name.nk2, and then click Copy.
- On the computer where you want to populate the AutoComplete feature, copy the file to drive:\Documents and Settings\user name\Application Data\Microsoft\Outlook.
- If the Outlook user profile name is different on the computer where you are moving the .nk2 file, you must rename the file with the same Outlook user profile name after you copy it to the correct folder. For example, if you move Kim Akers.nk2 from the original computer with an Outlook user profile name of Kim Akers, and you copy the Kim Akers.nk2 file to the new computer, you must rename it with the Outlook profile name being used on the new computer.
- When prompted about replacing the existing file, click Yes.
- Open Outlook to view changes.
Thursday, April 7, 2011
Level -002Freelancing, Programming, Trip & Tricks, Life Style, How to, Web Development, Open Source, Electronic,
Search Engine Submission - AddMe


